Thursday, April 17, 2014

Losing my Dad 04/17/14

 I've been gone a bit from my computer. Last month I flew back to my hometown 
of San Diego to help care for my aging Dad. He had been failing all last year and
 required hospice to come into his home in March. He passed away on April 2nd 
at home with all four of his children by his side. He was 89 years old.
This is a photo of him and my mom shortly after they were married. 
Oh, my gosh! He was so dashingly handsome! :)
(Mom wasn't too hard to look at either!)

This is my favorite picture of me and Dad. 1970 Disneyland.
 Look at his big hand holding mine. :)
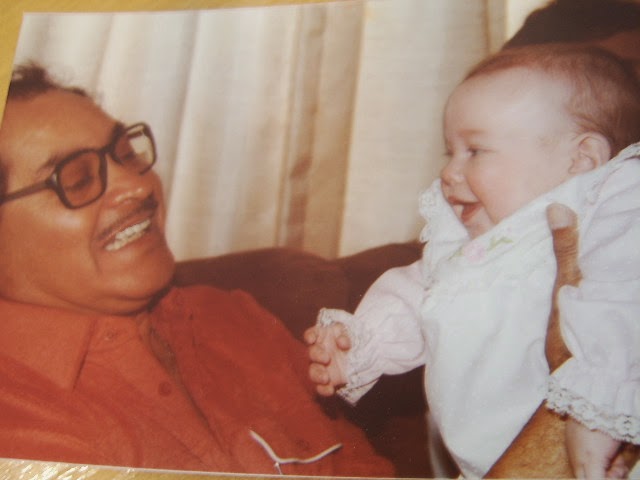
Holding my oldest in 1982.

After a day of golf a few years ago.  

Dad with his crazy dog, Little Bear...also affectionately known
as "Hump-o-matic."

I've never had anyone this close to me pass away. It was one of the hardest things I've ever had to do, to watch him fade and finally take his last breath. Although my heart is broken, I am so incredibly blessed to have gone through it all with my siblings. The four of us have always loved each other and been pretty close, but this experience has brought a depth to our relationships that I never knew possible. My dad was a complicated man and though he could be difficult, to say the least, we all loved him. We all share the same struggles and joys that came from knowing this man.

God is still good and I hold on to the hope that I may see my dad again. And this time he won't be sick! The resurrection of Easter is on its way! :)

Saturday, February 8, 2014

So close yet so far away.... 02/08/14


The pups want to stay inside with all the snow and cold out there but today they found a good reason to go out!

Monday, January 6, 2014

How to make a diorama ornament DIY 01/06/14

  
Last month I saw a cute idea that someone had posted to their vlog on making personalized diorama Christmas ornaments. 

 I wanted to try it but none of our craft stores had the right type of "open" glass ornaments.

So I hit the thrift stores and found this:

And at 1/2 price it was even better.


I started by taking out the base and removing the figures from it. 
(


 Then I found some pictures on my computer of the family I wanted to gift this to.


I printed tiny copies that would fit inside the globe. I also printed a flipped image to glue the images back to back so they'd be two-sided.


I dug around in my Christmas stash and found some mini stuff. I cut out the tiny images, glued them back to back and embellished the house with glitter-glue (for lights), pipe-cleaner (for wreath) and cotton (for snowman.)

But before I glued the house together I sandwiched a bent paperclip in the middle. This is how I attached the house to the base.


This is the back of the house. I did not embellish it.


This is the front. I also covered the edges of the roofline, the grass and the edges of the car with white craft paint to look like snow. I sprinkled glitter on it while the paint was still wet.


I found a scrap of syrofoam and cut it to size with a steak knife.


I glued it to the base with tacky glue and smeared some glue on top for the glitter to stick to.


While I was digging around in my Christmas stash I found some nice embossed dresden foil. I decided to use this as the back side of the ornament.


I put the dresden inside and tried to glue the edges of it to the globe but it was impossible! And it made a mess of glue on the glass. :(  I couldn't think of any other way to secure it, so I just left it kinda loose and inserted the house (back side toward it) up against it as best as I could. You can see the paperclip ends sticking out. 


I pressed the trees and family into the styrofoam where I wanted them and then removed them, put a dab of glue in each hole and replaced the trees and family. Let it dry a bit.


I then carefully squeezed the base back into the globe. I removed the gold hanger loop and used a tweezers through the hole on top to press the "legs" of the paperclip into the styrofoam. This is harder than it looks!


I put the hanger back on and it was ready to hang on the tree! (actually I wrapped it in tissue and put it back in the box for my sister-in-law.)


It was a really fun project but it took about 4 hrs! 

Tuesday, September 4, 2012

Hanging Lampshade Make-over 09/04/12


During my travels last summer, I happened across this beautiful repurposed hanging lamp. I fell in love with it but not with the $$$ price tag! I thought maybe I could rig up something of my own.
(Sorry, once again, I forgot to take pictures of the process...)  


Well, it's been a year since I considered this project  so I thought it was time to give it a go.  I took an old ripped shade thats supposed to go on a table lamp and ripped off all the material. I recovered the 22" metal frame with a tight t-shirt, removed the sleeves and handsewed it onto the frame.


I sewed some ruffles and glued them on along with some rosettes and "dingle-berries" (that's what we call ball fringe in my family). I tea-dyed and cut-up an old lace curtain and sewed it to the inside so it casts a pretty shadow when lit.


I bought a hanging lamp kit at Lowe's and voila. It was done. The hardest part was deciding where to put the frills. At first I draped the ruffles but it made it look too much like a wedding cake! I'm happier with the "victorian corset" look. It has a pretty hour-glass shape that shows-off the lace.  I still want to add a white chain or scrunchy over the cord.


Friday, June 29, 2012

Yellow at the Cottage 06/29/12

When the temperature gets this hot all you wanna do is sleep!


Or at least try to find a cool spot to rest!


Thursday, January 19, 2012

Warhol Pet Painting (kind of a "how-to") 01/19/12

This is my daughter's dog, Pee Wee. Pee Wee was an older dog who was left for months at the kennel because her owner died. My daughter cared for Pee Wee and got to know her while she worked at the kennel. My daughter fell in love with her and took her home. Pee Wee was a great dog with a kissable nose! Sadly, she passed away about a year ago.


This year for Christmas, I painted a Warhol-style picture of Pee Wee for my daughter.

I used the photo above as my starting point. I'm sorry I didn't take pics of the process, otherwise this would have been a very nice "how-to" entry. But in a nutshell:

I enlarged and printed the photo in black and white on the xerox machine in high contrast. Then I traced over the dog's outline from the xeroxed enlargement onto a plain sheet of paper. (I always tape my tracings to the window and the daylight works just like a light box!) On the back side of that paper, I covered each pencil line (back to the window!) with lead by swiping the broadside of the pencil lead over it. A bit of artists charcoal would also work.

Placing the image rightside up on your canvas, trace, again over the lines. This is how I transferred the exact image onto each square of the canvas. I wanted to use carbon paper but who has that anymore?
Then it was just a matter of filling in the spaces with paint, like paint-by-number! It was a very LOW tech project.


Saturday, August 13, 2011

Awesome Velvet Headboard! 08/13/11


I've been able to hit a few local thrift stores on a regular basis and saw this headboard a week ago. It was blue and really needed some help so I passed it by. Well, the other night I went to bed thinking about it so I called the next morning to see if it was still there. It was. I walked in, offered half of the asking price, and it was mine. I cleaned it up and it is fabulous!


It was a '70's stripedy blue and beige. I gave it a good scrubbing and sprayed a bleach solution on it. I was hoping to get a silvery shade of french blue grey and it worked perfectly. Above is a part on the back that shows a small portion of the original color.